Hi everyone. There have been a lot of favourable comments about the little woven box I made for Manu for the Christmas in July swap, so I thought I would have a go at creating my first photo tutorial.
Before I begin I will share a few lessons I learnt in the process:
1. When I make things in the future I should keep a note of how I made them.
2. When working on a tutorial where I am a little unsure of the process, I should work on two examples, then if I make a mistake on one I still have a good example to work with.
3. Take more photos than you need. It is better to find you don't need some than to find you should have taken more.
4. Start early in the morning so you don't end up trying to take the last of the photos in the gloom.
I have a habit of just making things up as I go, case in point the little box I made Manu, so it was trial and error to make a second box today for this tutorial. I made a few mistakes as I went along but hopefully this tutorial will give you an idea of how to make a woven box.
(Don't forget you can click on an image to enlarge the picture if you need to see more detail.)
Above is the old calendar I used, but alternatively you could use strips of light card. The strips I used were 4mm x 165mm.
I started this box with 8 strips. You can vary this depending on the height of the box you want. I taped one end of the strips to my work board.
Next, using some shorter strips (approx 80mm) weave between the 8 taped down strips in an under/over pattern. This photo shows the first two rows. The first row starts by going under the top strip. The second row starts by going over the top strip. I find it easier to weave on the end not taped down and then slide each strip back.
It is best to try to keep the 8 long strips close to each other at all times. You will find you will need to keep adjusting your weaving as you work to keep it tight.
Keep going until your work is of a suitable length where it can be divided into the four sides of your box, depending on the size you want your box to be. (My strip of weaving measured approximately 130mm). You should finish with a weave the same as you started with, e.g. if your first weave started with going under the top strip your last weave should also start by going under the top strip.
Fold the length of woven card in three places to create four equal sides (or as close to equal as you can).
On one side (shown on the left in the above picture) trim the ends of the strips that are on the top on the coloured side to 4mm and fold them over and glue at the back. This will secure the edge. Cut the other strips even with the edge (do not glue).
On the other side (shown on the right in the above picture) trim the ends of the strips that are on the top on the coloured side to 4mm and fold them over and glue at the back. This will secure the edge. Cut the other strips to approx 4mm lengths to create little tabs (do not glue).
(Note the above photo shows the end result on the reverse side of the box.)
Next bring the two edges together. You will find the 4mm tags will slot between two layers of card on the other side. Use a bit of glue to secure.
(You will note that where the two edges join you effectively have two similar weaves side by side. This does not really show in the finished box and I have found that this method is more secure and sturdy. However, you may want to experiment with this yourself as I am sure there are many other ways of making a woven box. This is just my method.)
To finish the top of the box cut each strip that sits on top to 4mm and fold over to the back and glue. Cut the other strips level to the edge of the box top and glue. We nearly have a box.
To finish the bottom of the box, put a dab of glue behind all the strips that are on the inside of the box and then trim them level with the box edge.
Trim the remaining lengths and fold them inwards, as shown above, leaving reasonable sized 'tabs'.
Next cut a square of card the same size as the bottom of your box. It may not be a perfect square as you may find each side of your box is not exactly the same length. Also cut a square slightly smaller to fit on the inside of the box. For both squares I have just glued strips of card on top for a nice finish. You might choose to cover it with more weaving. I have also edged the outside of the large square with a coloured pencil to blend the cardboard edge in with the rest of the box.
Put a generous amount of glue on the 'tabs' folded into the centre of your box and also a thin layer around the outside edge of the bottom of the box. Place the largest square on top. Then glue the smallest square inside the bottom of the box .
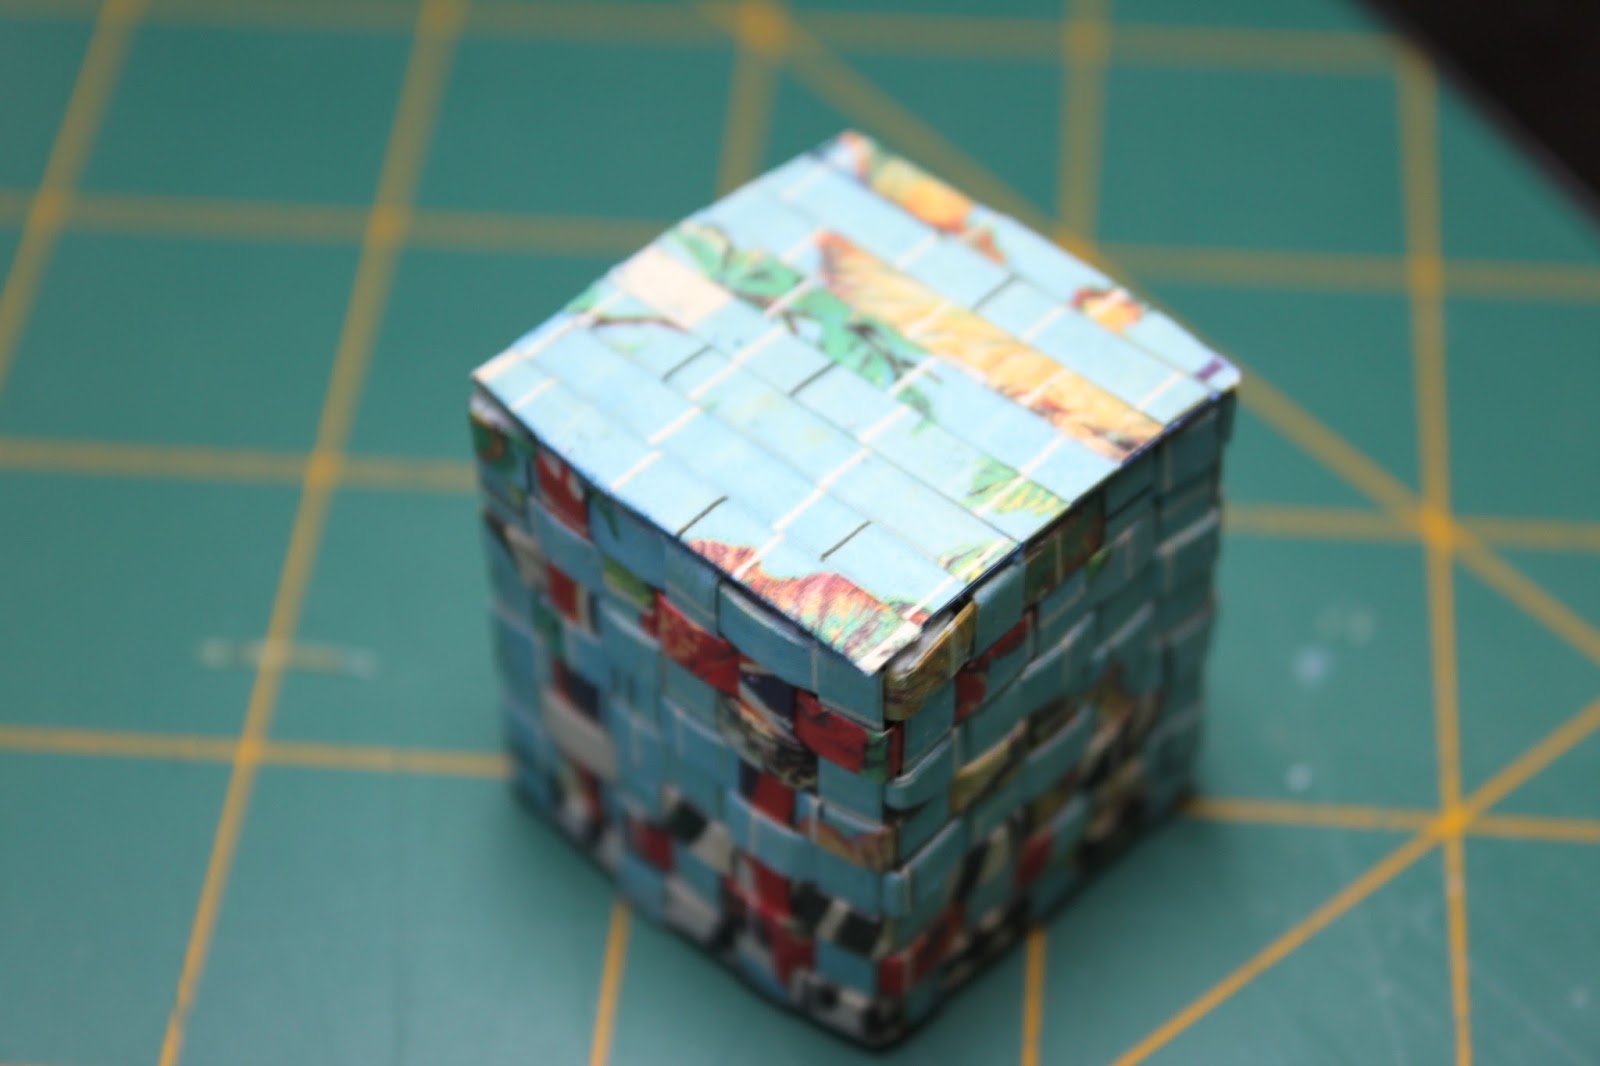
Ta Da... drum roll please... one miniature woven box.
You could also easily make a round box by not folding the woven strip and joining the two ends.
In putting this tutorial together I realise there are one or two places where a few more photos might have been helpful but I think as you work with your box in front of you most steps will become fairly obvious and hopefully my ramblings will make sense. If you have any troubles at all please don't hesitate to ask me for help. I'm only a comment away.


Wonderful tutorial. Thanks.
ReplyDeleteGreetings, Faby
Your tutorial is fantastic thank you for sharing.
ReplyDeleteHugs Maria
Прекрасная работа!
ReplyDeleteСпасибо, за детальный урок!
Хорошей недели!
Татьяна
Grazie Sharee per questo preciso tutorial. Proverò a realizzarlo anch'io!
ReplyDeleteUn abbraccio, Manu
Wonderful tutorial! thanks for sharing your secret! :)
ReplyDeleteClever Girl! I think that this is a great tutorial, Sharee and I foresee many usages for this little box in the future! Well done!
ReplyDeleteelizabeth
This is a great tutorial! I think you got the photos and instructions just right, I can see exactly what to do and can't wait to have a go! Thank you.
ReplyDeleteThanks for sharing this tutorial!
ReplyDeleteHugs
Melli
That is so intricate! Wonderful work. And the colors are beautiful. Thanks for the tutorial!
ReplyDeletehugs♥,
Caroline
Que bonito queda, muy colorido, además muy complicado enlazar tantas tiras.
ReplyDelete